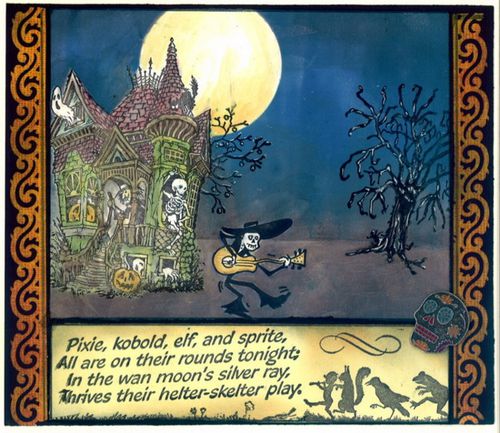
Il n'y a pas à dire, j'aime VRAIMENT la technique des fonds au brayer. Il sont à la fois rapides, lumineux, et réservent toujours de bonnes surprise. Leur secret ? Un papier couché (ou glossy), et un petit peu d'entrainement.
J'ai commencé par tamponner la maison hantée (fabricant inconnu) et le squelette musicien (3rd coast / AP 497 D). Puis je les ai masqués. J'ai rajouté un autre masque, tout rond, punché, pour faire la lune.
Enfin, j'ai appliqué mes encres au brayer : Dans l'ordre : Du violet puis du bleu marine pour le haut, du brun puis du noir pour le bas.
Il est relativement important de bien commencer par les couleurs les plus claires, et d'aller progressivement vers les plus foncées, ce afin de permettre un bon mélange des couleurs.
J'ai ensuite tamponné l'arbre grimaçant (3rd coast / VB 055 I ), et lui ai appliqué quelques touches de stylo gel blanc.
Pour finir, j'ai aquarellé les différents éléments.
J'ai terminé avec un petit poème et le tampon
Piper's parade (mon tampon fétiche ![]() !...), tous deux de 3rd coast
(WS 038 J et FA 281 G), sur du cardstock jaune, un embellisement et deux bordures punchées (EK success).
!...), tous deux de 3rd coast
(WS 038 J et FA 281 G), sur du cardstock jaune, un embellisement et deux bordures punchées (EK success).
Si vous êtes interessés par la technique du brayer, mais n'avez jamais essayé, je vous conseille les deux liens suivants : Le blog de Michele Zindorf et les quelques tutos que nous a concoctés Roni, membre de la DT.
Bizzzzzzzz.
Hi everyone,
I just LOVE the finish of brayer technics. Such a nice way to make fast and rich backgrounds.
I first stamped the haunted house (unknown) and the “Dancing dead” skeleton (AP 497 D) on a white glossy cardstock, and then masked them. I punched a circle mask, and applied it on the top of my card. Then I coloured background very fast with a Brayer, using purple first then dark blue ink on the top, and brown then black ink on the bottom. Remember : Always roll from the lightest ink to the darkest one. This way, colors will blend.
I stamped my “Screechy tree” (VB 055 I ), and added highlights with a white gel pen.
House, skeleton and moon were then colored with watercolour.
On a light yellow cardstock, I stamped the sentiment “Pixie, kobold, elf and sprite” (WS 038 J) and a part of the Piper’s parade (FA 281 G).
At last, I layered the whole stuff on a black cardstock, added a punched border (Ek success) and a sugar skull embellishment.
As I said, brayer is a wonderful way to create fast outdoor backgrounds. All you need is a piece of glossy paper and a little bit of practice. If you’re a beginner with this technics, I suggest you visit Michele Zindorf’s blog for many wonderful brayer tutorials, and RUSH to the amazing tutorials of our DT member, Roni, right here
Wish you’ll have a lot’s of fun.
Sandra